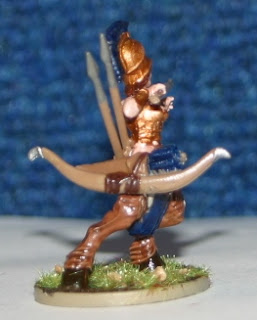
Showing posts with label tutorial. Show all posts

Wednesday, 24 September 2014

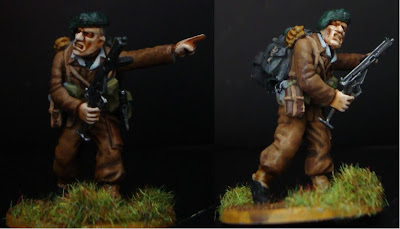
Tutorial: Painting British WW2 Commandos Part 1

Hi folks, 

Today I'm pleased to introduce you to Troy Brand of Brand Painting Studios who will be showing us how to paint World War 2 British soldiers like a pro.  If you're not a WW2 gamer you might find the colour scheme and techniques useful for painting imperial Guard or other SciFi troopers. That's all from me, over to Troy!

Ed

Warlord Games WW2 British Commandos
A couple of weeks ago I got my hands on some of Warlord Games' WW2 British Commandos. My first impression of them is that they are very well made. There are only a few mould lines to file off and all the pieces fit together very nicely. Some pieces, like the stocks on the sten guns, are very flimsy and prone to snapping before even clipping them off the sprue.  Another good impression it made is that the sprue contains more than enough arms, heads, berets, helmets and accessories to have a huge variety of poses, weapons and faces. So, having sat down and examined the pieces one by one and deciding on the poses I wanted, I went ahead with my little project.

Getting the right colour scheme

It is perfectly acceptable to paint Space Marines in red. However, anyone would consider it a cardinal sin to paint Red Army soldiers in that colour, and equally sinful to dress soldiers of the Wehrmacht in pink, however funny the implication might be. So the first thing to do before even priming your models is to look for reference material to get the colour schemes as accurate as possible. This also means researching the colours of the equipment as well as the uniforms themselves.  The internet is full of very good (and bad) sources for this but I found this rather handy picture on the Encyclopaedia Britannica's website which makes a nice reference.

British Commando Normandy campaign
British commando from 1944-45

Preparing the model


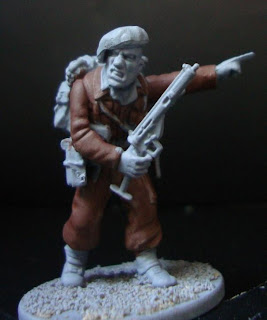
One plastic 28mm commando ready for painting
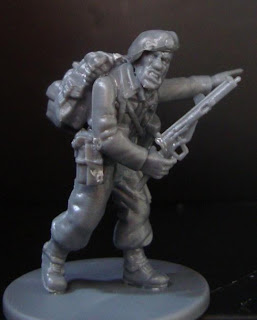
One 28mm plastic Commado ready for painting!
Once I had decided what colours I would use to represent our commando and his equipment, I decided I would try using a beret and equip the model with a sten gun, canteen and rucksack.After I had clipped the pieces I needed for the first model and filed them as necessary I put the model together and based it with some Citadel sand.


I proceeded to undercoat the model with Grey spray primer from Humbrol. Lately I find grey to be a perfectly good compromise between black and white. This has to do with the type of paints I normally use, which are acrylics. They usually need to be thinned down in order not to obscure detail. Two or more thin coats of paint are usually enough to cover a surface. Still, the paints retain a certain transparency. This allows for the colour to appear muted if the undercoat is black, or equally very bright if the undercoat is white.  Grey being more neutral allows for the true pigment of the paint to show after the second thin coat.

Painting the Commando's uniform

Painting World War 2 British uniform - base coat
Base coating the uniform
Having looked again at my reference, I picked Vallejo Flat Brown for the uniform. When painting large numbers of models it is easier to paint from one darker base coat and build highlights from it. There are other techniques which require the use of a neutral colour onto which shadows and highlights will be added, but for this model in particular, this was not to be.


Once the base coat was painted I then went on to paint the first highlights. These were achieved by layering on a 1-1 mix of Vallejo's Ochre Brown and Brown Sand. To this mixture I added a drop (or less than) of Vallejo Off White for the second layered highlight.
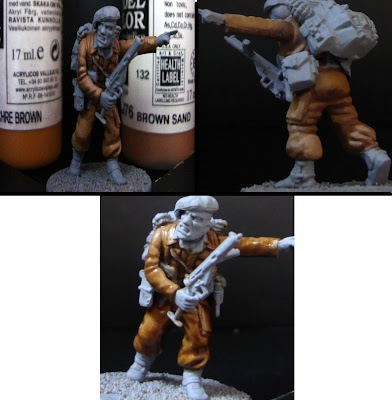
Painting World War 2 British uniform
Clockwise: First highlight, second highlight, wash for shading.
Like I mentioned earlier, some techniques involve darkening and highlighting certain areas of the model by blending in different shades from a neutral base. However for this model I have applied a more traditional technique of layering highlights on to a darker shade then using a wash to produce a smoother transition from light to dark as, after a couple of lighter layers it would not have looked very natural. To achieve this I used Vallejo's Sepia Shade. Another good wash would have been Citadel's Agrax Earthshade but I prefer Vallejo's because of a higher pigment saturation. If you have the old Citadel Devlan Mud, I would recommend it for this also.


Painting World War 2 British Commandos: Part 2
Troy continues his tutorial with tips on how to paint skin tones.
 If you enjoyed this tutorial, check out Troy's website. He does commission work and his rates are very reasonable. Ed

Tuesday, 27 August 2013

Conversion - Amazons with bolas

Once again we have a conversion tutorial and this time John uses the power of superglue to arm his Amazons with bolas. Whilst I haven't yet tangled with them on the tabletop ...okay, okay I'll get my coat and leave you to the tutorial... :-)

We've started playing a war game that has a rule in it that allows for entangling opponents. The miniatures I chose to play are Amazon warriors and while I'm extremely pleased with the choice, there weren't any weapons included with the figures that would be able to entangle an opponent. My choices for the ancient history period we're in are fairly limited (basically a net or a bola). After very brief consideration I decided to see if I could fashion a bola or two for my miniatures.

Wargames Factory Amazon with bola conversion
I started off looking up how the bola is made normally. Apparently it's simply three leather or rope cords about 2 or 3 foot long that are tied in together in a knot at one end; weights (stones, metal bits, etc) are fastened to the other end. The thrower uses the knotted end as a handle and swings it round and releases toward the target (s)he wishes to ensnare.

Wargames Factory Amazon with bola conversion
To create my bolas, first I got a bit of thread and three tiny beads. I probably should have used smaller beads or made the weights from a bit of greenstuff as I think the end result may be a bit big as far as the weights are concerned, but what I had at hand was what I used.

I measured and cut three pieces of the thread into 2 inch sections and tied them together at one end. In hindsight, it probably would have been better to measure out 6-7 inches per piece and tie them together and then cut off the excess to the correct length, as that would have made tying them easier.

Once the three pieces were tied I slid one bead on far enough that the end would wrap around the bead and touch back to the main piece of thread. With a touch of super glue I affixed the bead in place and then wrapped the end over the bead and fastened it to the thread with another drop of super glue. I repeated the process for each of the other two threads.

At this point I was fairly happy with my bola. It was quite floppy but I thought it was a good representation of what I wanted. My next task was to superglue the bola to the figure. In the process I accidentally got superglue all over the thread and my fingers, which caused the happy consequence of making all of the threads stand stiff. I let them dry in that position while I cleaned the glue off my fingers and then finally glued the first bola to the figure.

I followed the same process for the second bola (avoiding gluing my fingers the second time). After a spray undercoat of khaki color, bleach boned on the thread and then a wash in sepia, the cords were completed. Ghost grey was used for the weighted ends.

Wargames Factory Amazon with bola conversion


Wargames Factory Amazon with bola conversion


Wargames Factory Amazon with bola conversion

Friday, 9 August 2013

Instant Mold - Satyr Conversion

We're back with another tutorial from the prolific John Dulle whose Amazon warband has received yet more reinforcements. This time it's a female satyr, or faun as the Romans called them, involving assorted plastic bits, milliput and Instant Mold.

Having seen Eddie play a faun in our wargame, I thought it might not be a bad idea if my warband had one as well. The only problem is I wanted all my characters to be female and to look extremely similar. To remedy this, Eddie traded me some GW beastmen bodies for some of my Amazons.

Finished  conversion using Instant Mold and plastic bits

Finished conversion using Instant Mold and plastic bits

To start, I was running out of Amazons and wasn't sure how well the conversion might work, so I used a handy product called Instant Mold, which is a reusable material that can be used to create molds very easily and quickly (highly recommended). After melting the Instant Mold with boiling water and then putting it in the rough shape I needed, I created molds of the top half of a couple of my Amazon warriors; the top half is all I needed for a faun and a centaur (a separate project).

Once cooled, I used GEDEO brand resin plaster (similar to plaster of Paris but much harder when fully cured – I got mine at Hobby Craft) to cast two new top halves of my Amazons. Once cured (says 30 minutes to de-mold on the box but I suggest 2 to 24 hours to prevent crumbling), I then cleaned up the mold lines and set them aside for a few seconds while I hacked off the top half of the Beastman.

I then checked to see how the top and bottom halves would match up. After deciding on a good facing, I super glued the two pieces together. Because the two pieces had slightly different musculature, I needed to use a bit of filler to make the pieces appear to be seamless. I chose to use Milliput to do this (the choice was based on the quantity of the stuff I have that is beginning to get old).

Finally came putting the arms and head on the Amazon and deciding which weapons to outfit her with. Because I had a bit of left over Milliput and I'd chosen to outfit her with javelins, I decided to create a quiver for extra javelins and super glued it to her back.

Primed, painted, varnished, based and ready for battle.

Amazon satyr

Amazon satyr

Amazon satyr

Amazon satyr


Thursday, 1 August 2013

Instant Mold - Centaur Conversion

Greetings fellow travellers! Today we have our first ever conversion post written by my pal, John Dulle. John has been creating an impressive Amazon warband for our skirmish campaign and has kindly written up a few quick tutorials on how he made some of the more unique models in his warband. Enjoy!

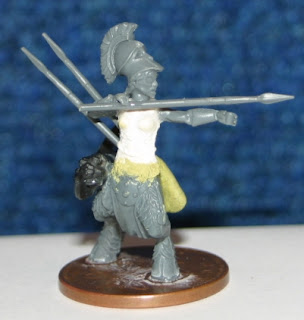
Instant Mold and plaster resin parts with plastic bits
Resin cast Centaur conversion - left view
I'd seen Centaurs used in battle against me and decided I needed to add some to my warband. With some finely donated horses to the cause, I decided to see what I could do to create my own centaur.

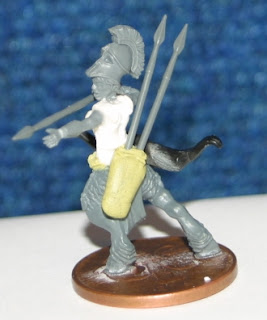
Instant Mold and plaster resin parts with plastic bits
Resin cast Centaur conversion - front view
The first thing I did was to use the Instant Mold to mold the two halves of the horse. I wanted to cast the pieces in resin plaster and join them instead of using the plastic horses given for the cause because I wasn't sure how successful it would turn out. Additionally I was casting the Amazon top halves at the same time, so it was easy to mix up the plaster I needed to do the job.
Instant Mold and plaster resin parts with plastic bits
Resin cast Centaur conversion - right hand view

De-molding the horses was done too quickly (only after 30 minutes) and the pieces broke and crumbled in a couple spots. I had to leave them for 24 hours to completely harden and then I glued the horse's legs back on.

After sanding the two pieces of the horse together, I super glued them and then super glued the Amazon top half to where the horse's neck came to. I used a bit of Milliput to cover the seams and the saddle, which I didn't want to show, and then super glued it to the base. I probably should have put the Milliput in the excess spaces of the base at the same time, but I ended up doing it after all the painting was done, which wasn't really a problem since the basing material covered it anyway. After attaching the head, arms and weapons, I primed the whole thing and did the undercoat in khaki spray paint.

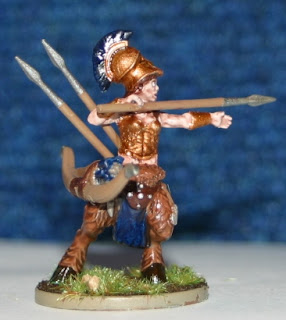
Painted, spray-lacquered and based. She had her first battle today.

Wargames Factory amazon Centaur conversion - left view
Wargames Factory Amazon Centaur conversion - left view

Wargames Factory amazon Centaur conversion - front view
Wargames Factory Amazon Centaur conversion - front view

Wargames Factory amazon Centaur conversion - right hand view
Wargames Factory Amazon Centaur conversion - right hand view

Wargames Factory Amazon Centaur conversion - head on view

Friday, 19 July 2013

Tutorial Painting British WW2 Commandos Part 2

Welcome back to our tutorial on painting World War 2 British soldiers like a pro.. If you haven't seen part 1 you can find it here.  Once again I hand you over to Troy Brand of Brand Painting Studios who today will be mostly showing us how to paint flesh. 

Ed

Painting the skin

Once I was satisfied with the uniform, which covers the largest percentage of the model, I moved on to paint the hands and face with Vallejo's Panzer Aces Flat Flesh. The Panzer Aces line has some very good flesh tones and I thoroughly recommend picking some of these up.  However, the paint in itself is a little pale at first. This is fine, as once a wash has been applied (once again I used Sepia wash) the paleness goes, revealing warmer tones as well as the details on the face.

British commando - Painting the face
Clockwise: base coat, wash, highlights

The highlighting on the face and hands was achieved by adding three layers: the first was a layer of Flat Flesh, then a 1-1 mix of Flat and Light Flesh (again from Vallejo) and finally a last one of Vallejo Light Flesh. Satisfied with the flesh tones I then painted the beret. This was a two stage process of painting a base coat of Vallejo Dark Green and highlighting it with a mix of Dark and Light Green.

Painting the sten gun

I picked this time to paint the sten gun, which looks a very, very dark metallic black. This I achieved by making a 2-1 mix of Vallejo Flat Black and Vallejo Gun Metal Grey. If I had not run out of the old Citadel Bolt Gun Metal I would have used that, as Citadel used to make the better metallic paints of the two brands. I then washed the sten with a thinned down wash of Citadel Badab Black. I have not used the new black wash from Citadel, but I really like the medium they used for the old washes. A very light drybrush with the original metallic brought out the details.

28mm British Commando - almost finished
The model after the skin highlights and the beret were finished, along with the sten gun.


Unfortunately I did not have enough presence of mind to take pictures of the remaining process, but essentially it boiled down to six areas: the shirt, straps, the rucksack, the pouches, boots and base.

The shirt was painted with a single layer of Off White, which makes a very good contrast with the rest of the model. The straps, equally easy to paint, were all painted with a single coat of Sand.

The original rucksack was a pale shade of green-grey which I achieved by painting the base coat with Vallejo's Intermediate Blue (a slightly blue-ish grey) followed by two consecutive washes of Badab Black.

The pouches were painted with Dark Green and highlighted with a 1-1 mix of Dark Green and Vallejo Game colour Heavy Khaki.

The boots were painted Flat Black and the leggings just above them are painted sand and washed with the same sepia wash.

The base was painted Dark Ochre, then given a wash made with thinned down Citadel Scorched Brown, finally touched up with static grass


The process may have seemed long-drawn and complicated, but the steps in themselves are easy, quick to do and if you apply an assembly line method where you are touching up the last model as the first one dries up you will find yourself finished before you know it. Time to take on the Fascist scum!

That's all for now folks. If you enjoyed this tutorial, check out Troy's website. He does commission work and his rates are very reasonable. Ed

Monday, 3 June 2013

How to pin miniatures

What is this pinning you speak of?

Pinning is a skill that most miniature enthusiasts pick up at some stage; essentially it's a method of securing a limb or other item to a miniature.  It's used in situations when superglue is not strong enough to hold the model together which is pretty often in my experience of superglue and metal minis.  The pin takes much of the weight of the appendage and takes the strain off the superglue. When done correctly it gives you a very strong bond.

Although it's particularly important when working with large metal models, even human sized figures may require it on occasion. Dynamically posed figures that come in multiple parts are frequent candidates for pinning. Since plastic and resin are lighter than metal it isn't often necessary with figures made from those materials.

Okay, so what do I need?
Superglue, a pair of side cutters or clippers, a metal paper clip and a pin vice. A pin vice (or vise to our American cousins) is a simply a small hand drill. You can get them from hobby stores, GW, Amazon and doubtless other places. IF you expect to be working with metal miniatures frequently then they're a good investment.
Tools for pinning minis
Tools: side cutters, paper clip and a pin vice.


Pinning an Ogre Gladiator Step by Step

Our test subject today is an Ogre Gladiator from Black Tree Design. Although the arm socket is well designed the arm is quite heavy and will be much stronger if pinned.

1. Prepare the figure
Clean any flash and mould lines off the figure in the usual way and then dry fit the figure and check that all the parts go together smoothly. If they don't, you won't be able to pin them properly as the glue won't take. File them down or otherwise remove anything that is in the way.  You may discover at  this stage that there's going to be a gap between the two parts. If this happens, fear not as you can fill it easily using green stuff after you've pinned the model.

Pinning a miniature 1
Dry fit the figure and make sure the parts go together smoothly.

2. Find a pin and a suitable drill bit
An ordinary metal paper clip makes a fine pin.  If you have to pin something particularly heavy, you could use a bigger and therefore stronger paper clip. To find the right size drill bit, line the paper clip up with prospective drill bits until you find a match. A slightly larger drill bit is okay as the super glue will fill some space around then pin.
Pinning a miniature 2
Find the right size drill bit for your pin by lining them up
 as in the picture.

3. Drill the holes
Pretty self explanatory this bit. Some miniatures are made of a harder metal than others so the effort of drilling can vary. I prefer to make the holes deep rather than shallow but be careful not to drill all the way through the arm and into your finger; it hurts. Yes, I speak from experience.

It's normally possible to line them up by eye but at times you may want more precision usually on very wide surfaces. There is a method for this but I didn't need to do it on this figure and forgot to include it as one of the steps. I'll do in another post soon.
Pinning a miniature 3
Holes drilled into the arm and the body.


4. Cut and insert the pin 
Using a pair of clippers cut off a short length of paper clip. Cup your free hand around the clippers as you do so to stop the bit you cut off flying across the room.

Without gluing anything insert the pin and fit the pieces together. If the pin is too small, cut a new one. If it's too long you'll see there is a gap between the pieces as shown in the picture below. When this happens, it's generally best to simply deepen one of the holes until it fits snugly.

Pinning a miniature 4
Cut the paper clip and check it fits in the socket.


5. Glue it together
Superglue the pin into the body and allow it to dry. Apply superglue to the pin and the area around it and put on the arm. Again leave it to dry. And that's it. Job done. :-)

Miniature pinned at last
Miniature pinned at last :-)


If you've found this post helpful, please take a moment to click the Google "+1" button at the bottem of the the page.  Whenever you give a page a "+1" you help Google to know that this a good page and ultimately help other people to find it.

Thanks for the +1 and happy pinning!

Thursday, 16 May 2013

Six reasons to use a wet palette when painting miniatures

One thing that many newcomers to this wonderful hobby do is use paint straight out of the pot.  I did too for a long time. However, one of the things that really helped me to improve my painting was when I started using a palette, in particular a wet palette.


So what is a wet palette? Well, it's a plastic lid with some old rag or kitchen towel in it and grease-proof paper on the top. It's cheap and easy to make and is on of the things that can improve you painting fast. If you want to see how to make one there's a quick tutorial here.

A wet palette for miniature painting
A wet palette

Why use a wet palette though? What's so great about it? Here are six reasons:
  1. You'll paint better
    Using any palette makes it possible for you to thin your paints and mix colours, both of which are essential for good painting. If you ever want to try layering or blending on your miniatures you'll need  to do both. There's so much to say about these that I'll talk about them in detail in a future post.
  2. Paint stays wet longer
    Paint can stay wet for hours on a wet palette at the right humidity and room temperature. Even in the least favourable conditions it stays wet much longer than anything on a dry palette. Given how quickly acrylics normally dry this is a huge advantage.  You also don't need to continually keep getting fresh paint out of a pot which can speed up batch painting considerably. If the paint is still wet on your palette, that means it won't dry on your brush whilst you're studying the miniature and thinking about what to do next.
  3. Keep you options open
    It's easy to keep several colours available at once which is useful when you want to go back and touch up a spot you missed or cover up a slip of the hand. You don't need to open the paint again, put paint on the palette and dilute it just to repair a small error.
  4. Get a point on your brush
    The wet rag in a wet palette is perfect for bringing you brush to a point without the need to lick it! Put the bristles of the brush on the rag and roll the brush in your fingers while moving it towards you. Try it, it's trickier to describe than to do!
  5. You use less paint
    Leaving you paints open for long periods of time means that they start to dry up. They're also more likely to get knocked over by pets, fellow gamers or other unwary passers by.
  6. No cleaning!
    Dry palettes get caked in dry paint quickly and need to be washed before they can be used again.  With a wet palette you can just throw away the grease-proof paper when you've finished with it and put some more on.
So, there you go. One simple way to improve your painting. If you want to know how to make one click here .

If you've found this post helpful, please take a moment to click the Google "+1" button at the bottom of  this page.  Whenever you give a page a "+1" you help Google to know that this a good page and ultimately help other people to find this information.

Thank you for the +1 validation and happy painting!


How to make a wet palette for miniature painting

A wet palette is a wonderful way to improve your painting - I did a post on six reasons to use one if you're not sure what the point of it is. Anyhow it's easy  and cheap to make and the chances are you already have what you need in the house:

  • An old lid of some kind. Anything waterproof will do. I normally use a small plastic lid but I have an old biscuit tin lid that I keep for the days when I want a big palette.
  • An old rag or some kitchen towel. Anything that holds water and won't disintegrate will work fine. Tissues don't work well.
  • Grease-proof paper or baking paper. you know, the kind of thing used for making cakes. Make sure it's not the waxy waterproof kind, as that won't work because it won't let the moisture through.

Once you've got these items fold up the rag or kitchen paper and so that it fits snugly on the palette.

How to make a wet palette 1

Make sure the rag is soaked with water and then pour off the excess.

How to make a wet palette 2
Pour off the excess water.
Press the paper down on to the wet rag so that it sticks and there aren't any air pockets. If it doesn't stick it won't work.

That's it. Get painting!

How to make a wet palette 3
A wet palette in action.
If you've found this post helpful, please take a moment to click the Google "+1" button at the bottom of  this page.  Whenever you give a page a "+1" you help Google to know that this a good page and ultimately help other people to find this information.

Thank you for the +1 validation and happy painting!

Wednesday, 8 May 2013

Painting Space Wolves the quick and easy way: Part 1

Introduction
The goal of this tutorial is not to paint 'Eavy Metal standard or award winning minis, it is much simpler. How can you paint your Space Wolves quickly and easily so that they look nice on the battlefield?  Fortunately it's not particularly difficult or too time consuming.  I decided to paint my Space Wolves grey because I'm not that keen on the official colour scheme but with a few changes you could adapt this tutorial to the normal scheme.

Space Wolf Grey Hunter ready for battle!
Getting started
The first step of course is to clean and assemble your figures. It's worth investing a bit of time at this stage as flash and mould lines do look really ugly later on if you don't remove them. It's also a good idea to glue sand to the bases now because then you can spray undercoat it when you're doing the rest of the model. Gluing and painting the base later is more time consuming in the long run.

Space Wolves undercoated with Uniform Grey
The next step is undercoating. If you're a beginner you may like to check out the post I did on undercoating before you do this.  For quick and easy painting, a coloured primer from The Army Painter is a must. This gives you the undercoat and the base coat in one fell swoop which speeds things up by saving the bother of base coating.. I used Uniform Grey but they make Wolf Grey as well for those of you who like the studio colour scheme.

Shading the easy way with washes and inks
The next step is to put in some shading. I do this by liberally applying a wash to the models. I used Army Painter Strong Tone Ink On these models but any black ink or wash should do. If you don't have a commercially made one then thin down some black paint with water and use that, making sure it gets into the recesses. The figures should now look something like this, a bit grubby but very 3D with the shading! Most importantly you can see the detail clearly.

Black ink adds shading and brings out the details

Proper painting starts!
Now begins the fun part; adding colours. It helps immensely if you don't need too many different colours. These Space Wolves just have red, yellow, brown black and metal.Using a limited number of colours has several advantages. One, you don't need to have so many paints which is important for the beginner on a budget. Second, it as stops the figure looking gaudy; gaudy is virtually always a bad look.  The last is so obvious that I think it's easily overlooked. The fewer colours you use, the quicker the painting.

Another trick to painting quickly is to paint batches or groups of models together. Personally I find three or four is a good number. Whilst one is drying you can paint the next. Keep using the same colour until it's on all the models. Concentrate on being neat and getting a smooth coat. When you've finished go back and tidy up any mistakes.

Space Wolves painted the quick and easy way
So there we are: three Space Wolves ready to do battle for Russ and the Emperor! They won't win any painting awards but as a group they look just grand for the battlefield and they didn't take forever to do. There's plenty that could be done to improve them and in part 2 of this tutorial we'll do just that.

Final thoughts
There are many fantastic miniature painters out there on the Internet. Many who are far more talented then me in fact and have armies of beautifully painted figures that grace a 40K battlefield.  Hours of work have gone into the figures and each one is a miniature work of art. Pun intended. If you want a tutorial on that method there is a rather good one here on an awesome Space Wolf blog.

It can be inspiring to  admire these figures but it's also a bit disheartening if you don't have the time or the skill to paint to that standard - and most of us don't.  I think this is partly to blame for the numerous armies I've seen over the years which are unpainted or simply black undercoated figures. People think every figure needs to be 'pro painted' and are afraid to even start. Hopefully this tutorial will help you get started with painting your army.

If you want to improve the models you painted before to a nicer tabletop standard, check out part 2 of this tutoral on painting Space Wolves the easy way.

If you've found this post helpful, please take a moment to click the Google "+1" button at the bottom of  this page.  Whenever you give a page a "+1" you help Google to know that this a good page and ultimately help other people to find this information.

Thank you for the +1 validation and happy painting!

Return to the Painting Articles page.

Saturday, 27 April 2013

Better Painting for Beginners: Undercoating your miniatures

It's often the basic things that help people paint better and more easily. In our rush to paint a shiny new miniature it's often tempting to skip those basic but rather tedious steps that give you a good foundation to work on. Today we're going to look at undercoating or priming your figures.

Whilst you can undercoat with a brush I think that most people tend to use spray paint. What could be easier I hear you ask? It's a spray can... Actually there's a bit of a knack to it if you want best results.  So here are my top tips gleaned from years of doing it wrong the first time....

  1. Spray outside. Aerosol fumes are toxic and unpleasant and you don't want to breathe them in. Really.
  2. Wear marigolds, you know, the gloves people wear when washing up.  Unless you really enjoy washing spray paint off your hands that is. If you wear gloves then you also have more choice about how to hold the figures because you're not fussed about getting paint on your hands.
  3. Undercoating miniatures
    Blue Tack is your friend when undercoating...
  4. Mount you figures on a nice piece of wood about three feet long. Use some decent Blue Tack so that they stay on firmly and you can move them around without risk of them falling off.
  5. If, like me, you live in the UK it's rare to get a day where there is no breeze at all. If possible try to find somewhere sheltered from the wind, otherwise take a moment to move around so you have the wind at your back. This stops the paint getting blown back at  you and away from the miniatures.
  6. Hold the can about 30cm or 12" from the figures. If you get too close the paint will pool and obscure shallow details like on the miniature of the king.  If your spray from too far away you'll get a dusty look. This is because the paint starts drying before it hits the model and means the paint won't stick as well when you get down to the fun part of painting.  Neither of these are fatal if you're just painting up a few grunts for your army but they won't provide a good base if you want to paint the figures up nicely.
  7. Bad undercoating
    Oops, sprayed too close!
  8. Start spraying just before the first figure and move along the row. Stop spraying just after the last figure. This should give you a nice even coat. You may need a couple of passes. That's fine, it's much better than doing one coat which is too heavy.
    Spray with even passes
    Start spraying just before the first figure and move along the row.
  9. Don't worry about getting the spray into every last area. Trust me, it isn't possible. Just touch up the areas you missed afterwards with a brush using a paint that covers well. If you missed a lot then reposition the miniatures and spray them again.
  10. Leave the figures to dry before touching them. Ten minutes is long enough, although I think that half an hour is better - it gives the odour of the aerosol a bit longer to dissipate too! I've heard that professional painters leave them overnight but frankly at my level I don't think it would make much difference.
Neatly Primed Miniature
One neatly primed with grey paint and accepting
the paint well. :) Note that the crossbow needs a little
tidy up where the spray missed. Typical!

Finally a few things to avoid - you'll just wish you hadn't bothered and, yes, I have done all of them over the years!
  • Don't undercoat in the dark or bad light. You'll miss loads.
  • Don't try undercoating in the rain and juggling an umbrella. Picking up minis out of a puddle is not fun...
  • Don't forget to check they are securely blue tacked.  Trying to find your minis in the bottom of a hedge is not fun either.

If you've found this post helpful, please take a moment to click the Google "+1" button at the bottom of  this page.  Whenever you give a page a "+1" you help Google to know that this a good page and ultimately help other people to find this information.

Thank you for the +1 validation and happy painting!


Friday, 26 April 2013

RPGs: Names and voice acting for charcters

One of my favourite things about GMing is the opportunity to play lots of different NPCs, for me they're often what make the story interesting as they interact with the Player Characters.  Over time I've picked up a couple of things which I find make life easier and bring NPCs to life more. Two of the main ones are character names and voice acting.

Names are important but easily overlooked in the midst of prepping a session.  It's unfortunate because Bob the blacksmith sounds lame. His Royal Highness Darren the Magnificent doesn't really work either and Julie the Jedi is going to be laughed at too.  Players just won't take these characters seriously.

It's good to think about names as part of your preparation for a game; always name important NPCs before the session and say the names aloud to check they don't have any unintended comedy value! It's often worth printing out a list of names to keep with you in case you need one on the fly.  YAFNAG is good source of fantasy names but there are tons of lists of baby names out there which are specific to different languages and cultures: Aztec, Roman, Spanish and a zillion others are all out there. Try to choose ones that are easy to say: Tathren'orienel may look good on paper but people will find it hard to pronounce - let alone remember.

Following on from character names is one my favourite techniques: voice acting.  Apart from the obvious benefit that it aids to immersion in the game there are a couple of more subtle advantages. When I voice a character I've noticed that players seem to listen more. I suspect part of this is due to the novelty factor since they're probably used to my normal speaking voice, but I think they also assume I'm saying something important because an NPC is speaking.  It certainly seems to help with keeping their attention.

Voicing characters differently also makes it easier for players to recognise who they are talking to, which is very helpful when they are interacting with several NPCs at once.  It can be confusing to talk to several NPCs who all share the GM's normal voice as it isn't always easy to follow who has said what.

However, even beyond these, the main reason for voice acting is to aid characterisation.  There are a couple of ways to achieve this.  An obvious thing to try are accents.  Some people are natural mimics and others are not, but it's always worth trying even if the thought makes your blood run cold at first! If your game is set in the real world then trying to do appropriate  accents is nice; the players will feel more like they are in Paris if everyone they meet speaks with a French accent.  In a fantasy world you can also associate different races with real world accents. The most notorious example is the Scottish Dwarf which has become so clichéd that it just irritates some people. Personally I quite enjoy doing dwarves with a Russian accent.  Like helping players to identify individual NPCs, this can also help players to quickly identify where a new character is from.

A word of warning however: do not do an accent that strains your voice! Or at least not for a prolonged period as you risk ending up with a sore throat.

Other things to try are varying your tone of voice and the speed of delivery  Soften your tone of voice for speaking the gentle Lady Allena and make it louder and brasher for the drunken barbarian in the tavern. Speak slowly and deliberately for the wise old monk giving them advice and quickly for the rogue who is trying to talk his way out of a failed con.  With non human characters, think about how they might speak or what other sounds they might make. For example, anything reptilian I tend to give a sibilant voice whereas giants and ogres usually get a deep voice.

Pet topics and catch phrases are also good and don't require any ear for accents.  They can be anything appropriate to the character and the setting and serve the same function as accents.  They can also lead to some fine comic moments!  A few examples include:
  • "I love the marine corps!"
  • "Are you still carrying that Colt? The Smith and Weston is so much better.."
  • "I suppose you can't help it, you are an Elf..."
  • "What you really need is a horse and lance..."
  • "Have you heard the teachings of Isis?"
How to put all this together then?  Easy - it's all about practice! Pick a character who you want to voice and try out some of the ideas above until you are satisfied with it. I often do this when I'm driving as it helps to pass the time.  You'll probably feel silly to start with but practicing will help you to get over it.  You'll also find that in the midst of a session, when you've got five players and your plot to think about, that it's much easier to do a voice you are familiar with.  With a bit of practice you can build up a repertoire of voices to work with.

Practising voices before the session also gives you a chance to consider some of the things your NPCs might say and gives you an excellent chance to get a feel for their personality. You don't want to learn a script and it doesn't matter if you don't say the things you were practising in the actual session; the main thing really is getting a feel for the character and how they speak.  Even if you don't do any voice acting as such, time spent 'rehearsing your lines' is always well spent in my view.

A few final words of advice. If you're not sure about all of this then start small. Think of a minor character like a barman or shopkeeper and try one or two of these techniques. You can then work your way up to doing major villains of your campaign as you confidence grows.  Don't worry about getting the voices perfect, and don't be afraid to ham it up a bit.  No one is going to get an Oscar for this kind of thing and it's unlikely your players could do any better! Remember, the important thing is to make the characters interesting and memorable and above all, have fun!

If you've found this post helpful, please take a moment to click the Google "+1" button at the bottom of  this page.  Whenever you give a page a "+1" you help Google to know that this a good page and ultimately help other people to find this information.

Thank you for the +1 validation and happy gaming!

Tuesday, 16 April 2013

Preparing your campaign: The Elevator Pitch

So you want to run a campaign. You tell your gaming group that it's going to be a sci fi adventure using Savage Worlds and they should make up some novice level characters. You meet for the first session and they enthusiastically describe their characters to you. Bob has a tough colonial marine type, Fred is playing a pacifist Vulcan scientist and Jane is playing a Jedi with no light sabre but a stack of magical powers. How, you wonder, will this work with hard sci fi Apollo 13 style scenario that you had planned? 

The problem here was that everyone has a different idea of sci fi.  All four people are referencing different bits of the genre and you've got ideas that are likely to conflict with each other. This is perhaps a slightly extreme example but many GMs just tell their players a genre and a ruleset and find that they run into difficulties later on because the game they want to play is not the same as the ones their players want.

The way to avoid this is to be clear about what you want to do from the start. This is where the elevator pitch comes in.  For me, this is the first and most critical stage in preparing a campaign. It's also helpful, although perhaps less vital, in creating a one shot adventure.  In case you haven't heard the term before, the idea of an elevator pitch is that you are in an elevator with someone important and have 30 seconds to sell them your idea, whatever that happens to be. The pitch needs to be clear concise and intriguing  So in terms of organising a campaign, it's a short description that gives the listener a good idea of what it's going to be about.  Sometimes a single sentence is enough. Some examples from campaigns I've run might include:
  • "Star Trek meets Ridley Scott's Aliens."
  • "Become a knight and rule a barony in the service of the king or the church."
  • "Hard-bitten LAPD detectives take on cybernetically enhanced criminals in the near future."
  • "A Game of Thrones with Elves and Dwarves and you need to put a member of your House on the throne."
  • "Drive out the Dragon from the Elven homeland so they can return from their exile."
  • "Star Wars before the Rebel Alliance appeared."
And a couple of example from one-shot games I've run:
  • "It's Firefly and you're doing a job for Mr Niska."
  • "You're ministers in the British government who uncover Cthulhu secrets, go mad and die."
Why is this helpful? Several reasons. One, you need to get clear in your mind about what kind of campaign you want to run. After all, if you don't know what you want to do in your campaign, how will the players know? It also allows you to establish the tone of the game; I find TV, film and book references helpful for this as they give people common points of reference. Keep in mind that if you're using a well established setting then players will expect certain things. For example, in Star Wars I would expect space fights, lightsaber duels and smugglers.  In Star Trek I would be anticipating more investigation and ethical dilemmas.  Both are sci fi but they are pretty different in tone and style.

Your pitch will probably also suggest how linear or sandboxy your campaign will be.  Some people have a strong preference for one or the other so it's wise to think about this early on.  You'll see that some of the above examples have a specific objective, others don't and in my experience both types of game can be good fun. Sandbox style games need plenty of interesting things for the players to do otherwise they end up drifting and people get bored. A more linear game with a specific objectives gives the player characters a goal to work towards and a sense of accomplishment when they achieve it, but they need to feel that they are actively shaping the story and are not simply puppets in the GM's pre-written novel.

An elevator pitch has another important task: it helps you find out if your players are interested in playing the game you want to run before you start prepping.  Yes, you could just announce that you're going to run that awesome My Little Pony RPG you bought last week but your players might not want to play it.  If they're your friends they may start the campaign for your sake but you'll likely run into problems.  People may start skipping sessions or the ponies might turn out to rather more violent than normal in the genre... 

Role playing is a cooperative hobby and it makes sense to find a game that everyone wants to play before you invest your time and energy in planning the campaign.  Just because you have a cool idea for a campaign doesn't mean it's going to work with your particular group of players at that particular moment. This doesn't necessarily mean it's a bad idea but it may simply  not catch their enthusiasm.  Sometimes the reasons for this are obvious, after all, if your group has just finished a long Pathfinder campaign they may not want to play another epic fantasy campaign right away, regardless of how neat the idea is. Sometimes people are just not interested and the reason why isn't really clear.

What I find best is to have a couple of ideas to put to my players before I do any serious prepping for the game.  I do this in a pretty informal way, usually chatting in the pub after the game. I talk about ideas I have for future games and see what people latch on to and also what they don't think will be fun.  I'm sure I've avoided some serious flops by doing this. For example, when I watched the first season of Sons of Anarchy on DVD I really wanted to run a campaign based on it.  Unfortunately none of my players were interested in motorcycle clubs or the TV show itself.  I also struggled to work out how to translate the TV show into an RPG, I just couldn't work out what I wanted to do in the campaign.  Happily I had other ideas, one of which grabbed the others interest and we did that instead.  We had a blast.

Keep in mind that one of the secrets to being a good GM is avoiding the obvious mistakes! Role-playing games run on the enthusiasm of the people involved.  Always find a campaign that both you and your players all want to play before you start and you're already halfway to running a fun game.

If you've found this post helpful, please take a moment to click the Google "+1" button at the bottom of  this page.  Whenever you give a page a "+1" you help Google to know that this a good page and ultimately help other people to find this information.

Thank you for the +1 validation and happy gaming!