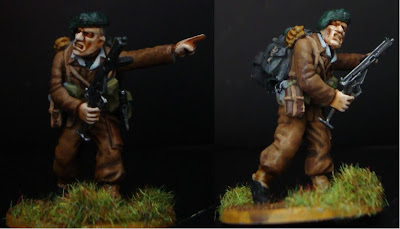
Welcome back to our tutorial on painting World War 2 British soldiers like a pro.. If you haven't seen part 1 you can find it here. Once again I hand you over to Troy Brand of Brand Painting Studios who today will be mostly showing us how to paint flesh.
Ed
Painting the skin
Once I was satisfied with the uniform, which covers the largest percentage of the model, I moved on to paint the hands and face with Vallejo's Panzer Aces Flat Flesh. The Panzer Aces line has some very good flesh tones and I thoroughly recommend picking some of these up. However, the paint in itself is a little pale at first. This is fine, as once a wash has been applied (once again I used Sepia wash) the paleness goes, revealing warmer tones as well as the details on the face. |
| Clockwise: base coat, wash, highlights |
The highlighting on the face and hands was achieved by adding three layers: the first was a layer of Flat Flesh, then a 1-1 mix of Flat and Light Flesh (again from Vallejo) and finally a last one of Vallejo Light Flesh. Satisfied with the flesh tones I then painted the beret. This was a two stage process of painting a base coat of Vallejo Dark Green and highlighting it with a mix of Dark and Light Green.
Painting the sten gun
I picked this time to paint the sten gun, which looks a very, very dark metallic black. This I achieved by making a 2-1 mix of Vallejo Flat Black and Vallejo Gun Metal Grey. If I had not run out of the old Citadel Bolt Gun Metal I would have used that, as Citadel used to make the better metallic paints of the two brands. I then washed the sten with a thinned down wash of Citadel Badab Black. I have not used the new black wash from Citadel, but I really like the medium they used for the old washes. A very light drybrush with the original metallic brought out the details. |
| The model after the skin highlights and the beret were finished, along with the sten gun. |
Unfortunately I did not have enough presence of mind to take pictures of the remaining process, but essentially it boiled down to six areas: the shirt, straps, the rucksack, the pouches, boots and base.
The shirt was painted with a single layer of Off White, which makes a very good contrast with the rest of the model. The straps, equally easy to paint, were all painted with a single coat of Sand.
The original rucksack was a pale shade of green-grey which I achieved by painting the base coat with Vallejo's Intermediate Blue (a slightly blue-ish grey) followed by two consecutive washes of Badab Black.
The pouches were painted with Dark Green and highlighted with a 1-1 mix of Dark Green and Vallejo Game colour Heavy Khaki.
The boots were painted Flat Black and the leggings just above them are painted sand and washed with the same sepia wash.
The base was painted Dark Ochre, then given a wash made with thinned down Citadel Scorched Brown, finally touched up with static grass
The process may have seemed long-drawn and complicated, but the steps in themselves are easy, quick to do and if you apply an assembly line method where you are touching up the last model as the first one dries up you will find yourself finished before you know it. Time to take on the Fascist scum!
That's all for now folks. If you enjoyed this tutorial, check out Troy's website. He does commission work and his rates are very reasonable. Ed

No comments:
Post a Comment